Estimated Read Time : 08 Min
Jun 29, 2021
Admin
Have you also purchased a new HP wireless printer? First of all, we would like to congratulate you on making a good decision to go with the HP printer. After buying a new printer, the first thing that comes to mind is to set up the printer. In this blog post, we will provide you with all the information about how to set up an HP wireless printer on Mac. So, if you also want to learn about the HP wireless printer setup process, then stay tuned and read this blog post until the last word.
How To Remove Packaging of HP Wireless Printer?
The first step in setting up the HP wireless printer is to remove the outside packaging. You must complete this process with all the precautions and avoid any hurry.
Here is the complete guide you can follow to remove the packaging of the HP wireless printer.
1. Removing Packaging Materials
- First, remove all the supplies and printer components from the box.
- Now, with gentle pressure, remove all the plastic from around the printer.
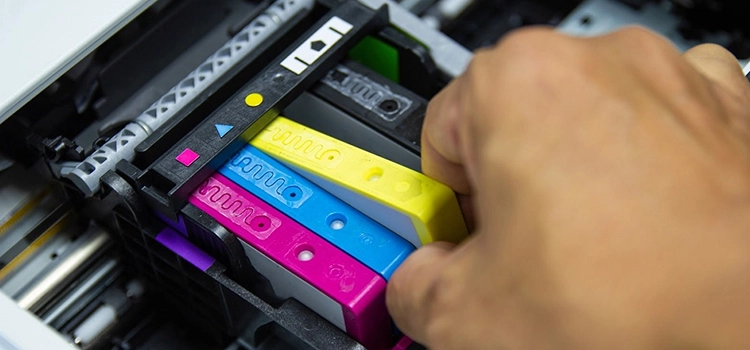
2. Filing Ink Cartridges
- Then take out the black ink bottle from the packaging and remove the bottle’s seal cap.
- After that, open the ink tank lid of your HP printer and open the black ink tank plug.
- Now, take the black ink bottle and put the bottle upside down.
- Let the bottle fill the ink tank itself.
- Remove the ink bottle and close the cap when the ink level increases to the maximum filling line.
- You can bottle store for future use.
- After that, put the black ink tank plug back in its place.
- Similarly, repeat the above steps for all the inks.
- Once you are done filling the ink tanks, then close the ink tank lid.
3. Removing Tapes and Cardboard Sheets
- Now, gently remove the warning sticker from the top side of the printer.
- Moving ahead, open the front door of the HP printer and take out the blue tape and cardboard.
- Similarly, remove the blue tape and cardboard paper from the printhead access door.
- After that, close the print head access door and the front door of the HP printer.
4. Establishing Main Connection
- Now, plug the main power cord in the printer, connect it to the main socket, and turn the button on.
- Thereon, press the power button on your HP printer. Take the main power cord of the printer.
5. Setup Printheads
- Moving ahead, access the printer’s printhead door and turn the orange handle of the ink cartridge box in the clockwise direction.
- Now, push down the blue latch to open it and then take out the orange handle from the printer and throw it away.
- After that, please remove the tri-color printhead and the orange plug and plastic tape from its packaging.
- Then hold the tri-color printhead by its sides, put it into the left slot, and apply gentle pressure at the end to get it to fit properly.
- Similarly, please take out the black print head and fit it on the right slot of the printhead.
- Moving ahead, push down the blue latch and close the printer’s print head and front access door.
- Thereon, begin priming your printer by pressing and holding power and resume buttons for three seconds.
- At last, hold the printer’s plain sheet into the input tray and adjust the guide accordingly.
So, you have now completed the first step towards the setup process of the HP printer. Thereon, let’s jump on to the next solution, i.e., how to connect HP wireless printer to Wi-Fi.
How to Connect HP Wireless Printer to Wi-Fi Network?
Before we directly jump on to the setup process, the users need to understand how they can connect their printer to Wi-Fi. Your printer can process a wireless print command through your laptop through the Wi-Fi network connectivity.
Requirements for WPS Wireless Connection:
Let’s have a look at the minimum requirements for connecting a wireless printer.
- Your HP printer must have the wireless connectivity feature.
- A router with a WPS button.
- A wireless network using the WPA or WPA2 password.
Here are the steps you can easily follow to connect the HP wireless printer to a Wi-Fi network.
- First, press and hold the “Wi-Fi” button on your HP printer for three seconds until the wireless light starts blinking.
- If your HP printer does not have a Wi-Fi button, tap on the “Wi-Fi” icon on the control panel screen.
- Under the wireless settings, tap on the “Settings” option.
- After that, under the menu list, scroll down a little bit and tap on the “Wi-Fi Protected Setup” option.
- Moving ahead, tap on the “Push Button” option, followed by a tap on the “Start” option.
- Now, press and hold the WPS button on your Wi-Fi router until the WPS light starts blinking.
- After that, the connection process will commence on your printer. This process will initially take around 2 to 3 minutes.
- Once the connection is established, it will show you the “Connection Successful” message on your screen.
- At last, tap on the “OK” option to end the process.
How to Connect HP Wireless Printer to Mac?
So, let’s look at the steps you can easily follow to connect the HP wireless printer to Mac.
- First of all, on your HP printer, press the “X” and “Wi-Fi” buttons together and keep holding the buttons together till the light starts blinking.
- Now, go to the app store on your Mac and type “HP Smart” in the insert box.
- Thereon, download and install this application on your Mac and launch it.
- After that, on the home page of the application screen, click on the “Add Printer” option available at the top side of the screen.
- Moving ahead, the application will start searching for your HP printer.
- Here, you can see your HP printer model number on the left side of the screen.
- There, click on the “Setup” option.
- After that, click on the “Continue” option, which is available on the lower right side of the screen.
- If a prompt window screen appears on your screen, then click on the “No Thanks” option.
- After that, you will be asked to type the Wi-Fi password in the insert box manually.
- Followed by the above steps, click on the “Connect” option.
- Establishing a wireless connection between the printer and Mac will take a few seconds.
- A new pop-up window will appear on your screen, asking you to press the flashing “Information” button on your HP printer.
- Do the same asked above; it will take a few more minutes to complete the process.
- At last, once the connection process gets completed, then click on the “Continue” option.
- Now, you are all down with the setup process. You can now see your printer’s name on the home page of the HP smart application.
- The application will also show you the level of ink cartridges in the printer.
So, that’s the end with setup procedure of HP wireless printer. Your HP printer is now all good to process the sample print test.
Ending Note
We hope you find this blog well. In this blog post, we have covered the complete procedure of how you can set up the HP wireless printer. In case you face any challenge while performing the above procedure or have any other query related to the topic, then you can reach out to us through the chat box.
Frequently Asked Questions (FAQ)
1. Why is my Mac laptop unable to find my HP printer?
A: In case if your Mac is not able to search for the printer, then here are some tips that you must ensure to check.
- Check the internet connectivity.
- Check the printer’s connection.
- Download the new updates for Mac.
- Update the printer’s firmware software.
- Reset the HP printer’s settings.
2. Why my Mac laptop is not connecting with the HP wireless printer?
A: When your laptop is not connecting with the printer, try to remove the printer from the list and add it again by selecting the “printers & scanners” option. This will help you to resolve many offline printer issues.
3. Where can I find the HP printer WPS pin?
A: You can search for the WPS pin from the backside of the HP printer. This pin can help you to connect the printer to the Mac.
4. Why is my HP printer not printing any documents?
A: If the ink cartridges in your HP printer are empty or have not been installed at the right place, then it can be a reason why the HP printer may not be processing print commands. Here, you have to ensure that the ink cartridges are not empty and are fitted correctly.
5. Does HP printers work smoothly with expired ink cartridges?
A: Yes, you can easily use the expired ink cartridges on your HP printer. Beyond the expiry date, you can use the ink cartridges for one to two years. If you have not opened the ink bottle, then it can be used for an even longer time.